How Professional Teeth Whitening Works
Our three-step process is simple, safe, and delivers the same results as visiting a dentist. Everything you need is shipped to your door.
Take Your Impressions at Home
When your kit arrives, you will find everything needed to create dental impressions in the comfort of your own home using state-of-the-art vinyl polysiloxane impression material. The material is not runny, does not gag you, and takes an exact impression of your teeth.
With an exact impression, our lab creates an identical replication of your teeth and fabricates a mouthpiece that is snug and fits the contours of your teeth. This keeps the whitener evenly distributed on your teeth, resulting in whiter teeth with less sensitivity and in a shorter time.
Step-by-Step Impression Instructions
- 1. Read all instructions prior to proceeding.
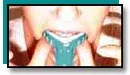
- 2. Take a ball of gray putty out of the gray container and a ball of blue putty out of the blue container. With the tips of your fingers, mesh and knead them together until they become one color. Do this quickly before the material begins to harden.
- 3. Roll the meshed putty into a 2-inch long hot dog shape and place it into the tray. Mold the putty so it is evenly distributed throughout the tray.
- 4. In front of a mirror, place the tray in your mouth and position your upper teeth between the front two walls of the tray, making sure your front teeth do not scrape the inner wall.
- 5. Place your thumbs under the tray bottom and press the tray directly upwards as far as you can. Hold the tray steady for 90 seconds. Do not move the tray or talk during this time, as motion will distort the impression.
- 6. After 90 seconds, slowly pull the tray down and extract it from your mouth.
- 7. Inspect the impression, making sure it captured the tops of your front teeth past the gum line and that the impression is not distorted. If the impression is not good, remove the putty from the tray and redo with a new putty mix.
- 8. Repeat steps 1–7 on your bottom teeth.
- 9. Place both impressions in the prepaid return envelope and seal the bag. Place your personal information card into the small pouch on the outside of the envelope and mail it to the lab.
- 10. Ten to fifteen days later, you will receive your custom-fitted mouthpieces.

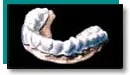

Lab Makes Your Custom Mouthpieces
Our professional dental laboratory receives your impressions and crafts custom-fitted mouthpieces using the same process and materials that dentists rely on. Every mouthpiece is precision-made to fit your unique dental profile.
Custom-fitted mouthpieces are essential for safe, effective whitening. They hold the whitening gel directly against each tooth surface while keeping it away from your gums. This prevents irritation and ensures even, thorough whitening.
Once your mouthpieces are complete, they are shipped back to you along with your professional-strength whitening gel, shade chart, and carrying case. You are now ready to begin whitening.
Apply the Professional Whitener
Applying the teeth whitener to your teeth is very easy with your custom mouthpieces. Most customers see noticeable whitening after just the first application. Full results of up to 8–10 shades whiter are typically achieved within 1–2 weeks.
How to Apply the Whitener
- 1. Brush and floss your teeth prior to wearing the tray.
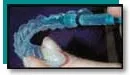
- 2. Place a small dab of whitening gel halfway up the front of each tooth compartment in the tray. Cap and retain the whitener syringe for next treatment until empty. Each syringe contains approximately 3–6 treatments.
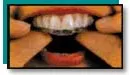
- 3. Insert the whitening tray in your mouth over the teeth. Seat the tray firmly against the teeth.
- 4. Wipe off excess whitener that seeps over the brim of the tray onto your gums. Hold the tray up with one hand and wipe the excess off with your finger or a tissue. Wear the tray 4 or more hours if using Carbamide Peroxide whitener, or 30–60 minutes 2–3 times a day if using Hydrogen Peroxide whitener.
- 5. Remove the tray and rinse off your teeth. Brush away any remaining whitening gel. Clean the tray with a toothbrush and cold water, then store it in the carrying case.
Use your included shade chart to track your progress. Repeat the process daily until your teeth reach your desired shade, then use monthly touch-ups to maintain your results.
What is Included in Your Kit
Everything you need for professional teeth whitening is included in one complete package.
Start Whitening Today
Order your complete professional teeth whitening kit for just $99.95. 100% money back guarantee.